What are mushroom growing kits?
A mushroom growing kit is essentially the medium where fungus spores can be inoculated in a sterile manner, and it’s where magic mushrooms will grow and develop if ideal conditions are maintained.
Mycelium is a white fungus contained in the substrate, and is akin to the seed of the mushroom. The whiter the mycelium, the better, as it translates to a higher yield. It’s important to discard any kits that are colourless, as it could indicate contamination.
Buying mushrooms and growing them at home step by step
Although this might seem like a complicated task for beginners, it’s actually easier than many imagine—just follow a few simple steps.
Step 1: Using the mushroom growing kit for the first time
The first thing to do is to open the kit box and take out all its contents: a plastic container with the “loaf”, clips, and a plastic bag. It’s advisable to use gloves and a mask if possible. Being as hygienic as possible throughout the process will prevent contamination.
It’s necessary to keep the removed lid in a clean place, such as a ziplock bag, as it will be needed later for the bread’s reuse. To do this, rinse it with distilled water and dry it properly before storing.
In some models, the clip and plastic bag are not included (it’s important to check this in the chosen product’s specifications), so it will be necessary to use a small or large propagator depending on your needs.

Step 2: Achieving a successful magic mushroom yield
Once opened, the kit should be placed with the plastic container, without the lid, along with the mushroom bread inside the plastic bag included in the kit. It’s important to open the bag once a day for air renewal.
In the case of growing them in a propagator, the container should also be placed without the lid, and the ventilation windows should be closed to achieve a high humidity percentage.
Next, place the container with the bag or the propagator in a location with natural light, but avoiding direct sunlight. If the right type of light is not available, it can be substituted with energy-efficient lamps or low-power LED lighting (for example, 26W LED strips or 42W LED).
When using artificial light, it’s estimated that they should be exposed to 12 hours of light and 12 hours of darkness.
The ideal temperature ranges from 18 to 23°C, with 23°C being optimal for excellent harvests. If you want to grow during the winter, a propagator with built-in heating may be useful.
Step 3: Maintaining and controlling environmental conditions
Once the mushroom kit is set up, lightly spray the inner walls of the bag (never on the “loaf”) every day or every two days with distilled or osmosis water to maintain the proper humidity. It’s also important to avoid cold drafts and direct sunlight on the kit.
If condensation is observed in the bag or greenhouse, it indicates that the humidity is adequate. However, for better environmental control, it’s important to use a thermo-hygrometer. This ensures that the humidity and temperature parameters are met for magic mushrooms to thrive abundantly.
It’s also important to pay attention to signs that may indicate incorrect temperature. For example, if the temperature in the mushroom cultivation kit is too high, you may observe white filaments protruding from the mycelium. On the other hand, if the temperature is too low, growth may be delayed.
When it comes to growing your own mushrooms, patience is key. Carefully observe progress while maintaining optimal conditions until the mycelium begins to fruit.

Step 4: The miracle of mushrooms, first signs
Watching with excitement as the first mushroom buds appear is a unique experience. Once they start to emerge, position the bag vertically, leaving space above the “loaf” for the mushrooms to grow properly.
When the first mushrooms are fully formed, you can open the bag slightly to prevent excessive moisture buildup and avoid droplets falling onto them, preventing spoilage. If using a propagator, open and close the ventilation windows to facilitate excess moisture evacuation and air renewal.
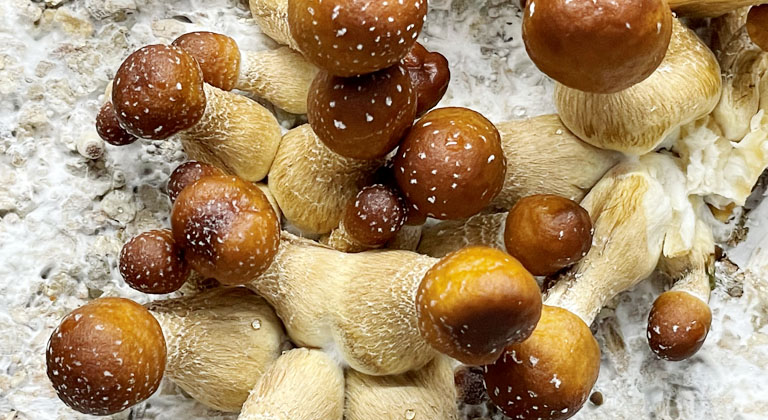
Stale air is detrimental to mushroom development. Harvesting the first mushrooms should be possible a few hours after the initial appearance of the shrooms, meaning not too long after they look like the image below.

Step 5: The art of harvesting hallucinogenic mushrooms
To know when it’s time to harvest, observe the underside of the mushroom cap. The perfect moment is just before it opens and reveals the gills containing the spores. This is essential to ensure an optimal harvest.
Be extremely careful and maintain maximum hygiene conditions during the harvesting process. It’s recommended to use nitrile or latex gloves for this crucial moment. For a proper harvest of hallucinogenic mushrooms, grab the mushroom from the base and twist it gently to detach it without breaking the stem. This way, space is left for the bread to be colonized again, allowing for new mushrooms in that area.

Step 6: Effective drying of mushrooms
Fresh mushrooms only last a few days in the fridge, so drying is often required for long-term preservation. Considering that 90% of the mushroom’s body is water, they are prone to rot or be attacked by pathogenic fungi. Therefore, drying is crucial for preservation.
Drying trays can be very useful for this process, allowing complete ventilation if mushrooms are placed so that they do not touch each other. Unlike during cultivation, exposure to sunlight is beneficial during drying. Placing the drying tray near a window receiving sunlight can expedite the process.
Another effective drying method is using silica gel. To use it, place the silica gel at the base of the container or greenhouse, arrange the mushrooms on a tray or lid without touching, and close it.
Mushrooms are dry when they feel crispy to the touch and break easily; they should be completely free of moisture. At this point, they can be stored in airtight bags or glass jars.
If a dehydrator is available, mushrooms can also be dried at a low temperature, around 50°C.

Step 7: Maximizing mushroom yield
Mushroom “loafs” can be reused without the need to inoculate new spores. After harvesting all the mushrooms, fill the container with distilled or osmosis water to promote new life formation in the mycelium and ensure the necessary hydration for the development of new mushrooms.
Next, close the container with the lid saved in step 1 and let it rest for twelve hours, preferably in the fridge. After these hours, open a corner of the lid and pour out any excess water not absorbed by the bread.
It’s then possible to start the process again from step 1. Mushroom “loaves” can be reused several times, as long as strict hygiene conditions are maintained at each step.
Depending on the conditions, a single magic mushroom kit can yield 1 to 5 harvests, with the later ones often being less productive.
It will be evident that the bread will no longer produce more magic mushrooms when no new mushrooms appear after three weeks. The color of the bread can also indicate its usability; if it turns yellow, red, green, or gray, it means it is contaminated and will not yield any more mushrooms.
It’s also possible that mushrooms start growing all over the “loaf” after the first harvest or even during the first. In such cases, the mushroom “loaf” is usually removed from the container or tupperware and flipped so that the mushrooms can grow on the side where they initially emerged.

It’s important to emphasize that the success of growing this product depends largely on the climatic conditions that the user must provide. Therefore, it’s crucial to understand that we cannot accept claims in case of contamination or if the mushrooms do not grow as expected. We are here to provide all the necessary support and guidance to make the experience satisfactory, but it is essential to follow the guidelines and recommendations provided carefully to achieve optimal results.
We hope this guide has been useful for your mycological studies. For any questions, feel free to ask via the comments of this post.


2 responses
Maalesef yaşadığım ülkede yasal değil ve erişim sağlayamıyorum. Keşke gizlice türkiyeye gönderebilseydiniz
Merhaba,
Maalesef bu tür ürünleri Avrupa Birliği dışına göndermiyoruz,
Saygılar,